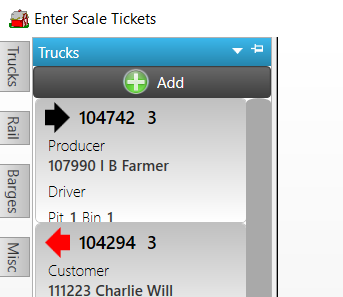
Use Enter Scale Tickets to create a new Scale Ticket.
|
Scroll through the existing tickets on the Pending tickets list and narrow the tickets by selecting Truck, Rail, Barges or Misc. |
Use Add New Scale Ticket to create a new ticket and select Inbound, Outbound or Custom Weigh from the Type drop down list. Learn about creating an Outbound ticket for Open Storage or Grain Bank here.
Learn about creating and using Custom Weigh Scale Tickets here for Items like seed and fertilizer.
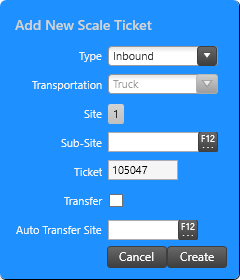
Transportation defaults to the Type selected and can be updated using the available drop down list.
Site populates with the Site ID for the User Profile creating the ticket.
A Sub-Site can be referenced to indicate the a Location that will receive grain on a temporary basis. See Add Sub-Sites for Grain Transactions for details.
Ticket populates with a system generated numeric ID but can be modified by clicking into the field entering a new alpha-numeric ID. See Setup > Access Locations > Commodities & Grain Merchandising > Scale Tickets for additional details on setting the ID Ticket Sequence.
Select Transfer to indicate moving a commodity to another Location.
If needed, select an Auto Transfer Site by entering the Site ID or use F12 to search to use the scale weight from the location with a scale and auto-create transfer tickets for the locations with no scale present. This is available for Locations with Auto Transfer Site selected in Access Locations > Commodities & Grain Merchandising > General.
Click Create to create the new ticket.
Enter a Scale Ticket
Once a new Scale Ticket is created, use the following functions are available.
 Click into the number field and indicate the number of copies of the ticket document to print.
 Click to set the Ticket status to Apply. Use the drop down list and select Reject.
. Use Void to remove all information about the ticket.
The top section of the ticket uses the details from Add New Scale Ticket and includes fields for
- Moisture Meter- enter the ID or use F12 to search
- Scale 1- enter the ID or use F12 to search, Default Scale IDs are added in Setup > Access Locations > Commodities & Grain Merchandising > Scale Tickets they will populate automatically.
- Scale 2- enter the ID or use F12 to search.
Any field tagged with  indicates a required field.
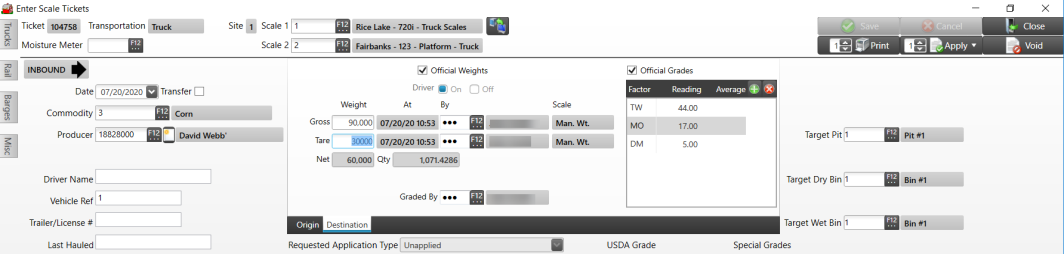
The Date field defaults with the date the ticket was created with the associated DPR record will be recorded with this date. This field can be edited. The Transfer checkbox is selected if the Ticket is for a Transfer.
Enter the Commodity ID, also known as Item ID, or use F12 to search. Reminder: A cash spot price must be available for the commodity.
Select the Producer, the customer delivering to the Coop on an Inbound ticket or possibly a grain terminal for Outbound, by entering the Producer ID or use F12 to search.
Vehicle information can be recorded on the ticket and allows entry of
- Driver Name of up to 40 alpha-numeric characters.
- The Vehicle Reference allows up to 20 alpha-numeric characters
-
Trailer/License will indicate specifics about the trailer.
- Last Hauled, if known, will indicate the commodity the vehicle hauled prior to the current ticket.
Weights and Grades
Weights
Select the Official Weights checkbox to determine which weights will be used to calculate value.
Use the checkboxes to indicate if the weights indicate Driver On or Driver Off.
Enter the Gross Weight or click F6 to capture the destination weight for Inbound and Origin for Outbound tickets from Scale 1 or F8 to capture the destination or origin weight from Scale 2.
At displays the date and timestamp when the weight captured and By displays the Operator name
Enter the Tare or click F7 to capture the destination tare from Scale 1 or F9 to capture the destination tare from Scale 2.
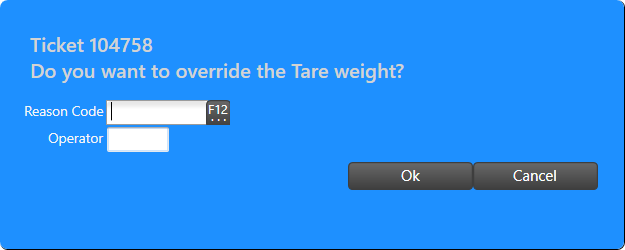
Both the Gross and Tare Weight can be edited by entering the new weight and providing a Reason Code ID, or use F12 to search, and entering an Operator ID, then click OK.
Net weight quantity is automatically calculated by subtracting the Tare from the Gross weight converted to bushels.
The Quantity field populates with the number of bushels based on commodity weight set in Item detail.
Inbound tickets are based on Origin and Outbound tickets are based on the delivery point.
Grades
Select the Official Grades checkbox when appropriate.
Any Grades associated with the Commodity selected populate automatically which displays the Factor, Reading and Average.
Use  to add an additional Grade which should be included in the Discount schedule for the commodity.
To remove an existing Grade, click on the Grade then click the  button.
Add a Target Pit, Target Dry Bin or Target Wet Bin to the Ticket by entering the ID associated or use the F12 button to search.
Use the drop down list to choose a default Requested Application Type for the ticket which can be edited later.
USDA Grade is based on the Grade set in Setup > Grades > US Standard Grades.
A Special Grades may also be associated.
 Be aware to create a Ticket the Apply button must be selected.
General

Status will display Active, Applied or Settled.
Applied By displays the
Use the Split field to apply an existing Customer Split to the Ticket by clicking F12 to view and choose from the available list.
When the Driver Approval checkbox is selected, it indicates that driver approves of the weights and grades for the ticket.
Enter a Farm reference in this 10 character alpha-numeric field.
Reference a customer Field by entering a Field ID or use F12 to search. See View Field Tracking for details.
A Producer Ref of up to 20 alpha-numeric characters can be entered.
Freight
Enter a Rate amount and select Per Quantity or Per Load from the drop down list. Use the drop down and indicate if this is Official, Origin or Destination weight for the ticket.
Provide an Expected freight amount if known.
Use the drop down list to indicate the freight Type of None, Third Party, Internal, or Intercompany. If Third Party is selected, provide a Freight Vendor or if Intercompany, select the Site ID.
Spot Bid Price at Delivery
Set a Spot Bid Price at Delivery section shows the current spot bid price for reference. If you are spotting a load, the actual spot price for this ticket can be changed on the Cash/Spot application line.
- Futures
- Basis
- Cash
Comments

Use the Comment field to enter internal notes of up to 100 alpha-numeric characters about the ticket.
Board Comments will display on any available Board, up to 40 alpha-numeric characters.
Adjustments
The Adjustment section offers the ability to add two types of adjustments, one that affects the entire ticket or one that affects an application on a ticket. Adjustments can be added automatically to tickets based on the Producer selected by adding the Adjustment to the Commodities & Grain Merchandising section on the Producer Ship to address.

Use the Add button to add a line to the Adjustments grid and enter the Adjustment ID or use F12 to search. Learn more about creating Adjustments here.
Applications
The Applications section becomes active after the Ticket is saved and indicates how the customer wants their grain handled. Reminder: The ticket is not created until Apply is selected.
Navigation
 Select to access the Select Customer Split window to choose from existing Customer Splits. Multiple Splits can be added to a ticket. Learn about Customer Splits here. Select to access the Select Customer Split window to choose from existing Customer Splits. Multiple Splits can be added to a ticket. Learn about Customer Splits here. |
|
 Create a new Customer Split by adding a line item to the Application tab. See an example of a Split and Ownership Transfer here. Create a new Customer Split by adding a line item to the Application tab. See an example of a Split and Ownership Transfer here. |
|
 Add a line to add an Application beneath the Producer. Add a line to add an Application beneath the Producer. |
|
 Add an Adjustment to an Application. Add an Adjustment to an Application. |
Understanding the Applications Grid

The Producer ID and Name populates automatically with default information populating from ticket entry.
- Percentage defaults to 100% until the ticket is split.
- Net Wet Quantity is copied from the top of the ticket
- Qty Disc
- Qty Net also matches the Quantity field from the top of the ticket.
- Value Gross
- Value Disc
- Value Adj
- Value Net
- Application
Expand the plus sign to the left of the Producer name to access the Application grid which populates with Unassigned. Use the drop down list to select a different Application.
Understanding the Settlements tab
The Settlements tab displays any settlement against the ticket.

The Producer ID and Name populates automatically with default information populating from ticket entry.
- Percentage defaults to 100% until the ticket is split.
- Net Wet Quantity is copied from the top of the ticket
- Qty Disc
- Qty Net also matches the Quantity field from the top of the ticket.
- Value Gross
- Value Disc
- Value Adj
- Value Net
- Application
View TTRs
Any TTR associated with the ticket will be listed.

The information includes
- TTR which is the TTR ID
- Any Reference information entered.
- Type
- User
- Period
- Date/Time
Click the View TTR button to see additional information on the transaction.